Table of Contents
Introduction:
A 12V DC motor speed controller circuit is an electronic system designed to regulate the speed of a DC motor powered by a 12-volt supply. The primary purpose of this circuit is to control the motor’s rotational speed without compromising its torque.
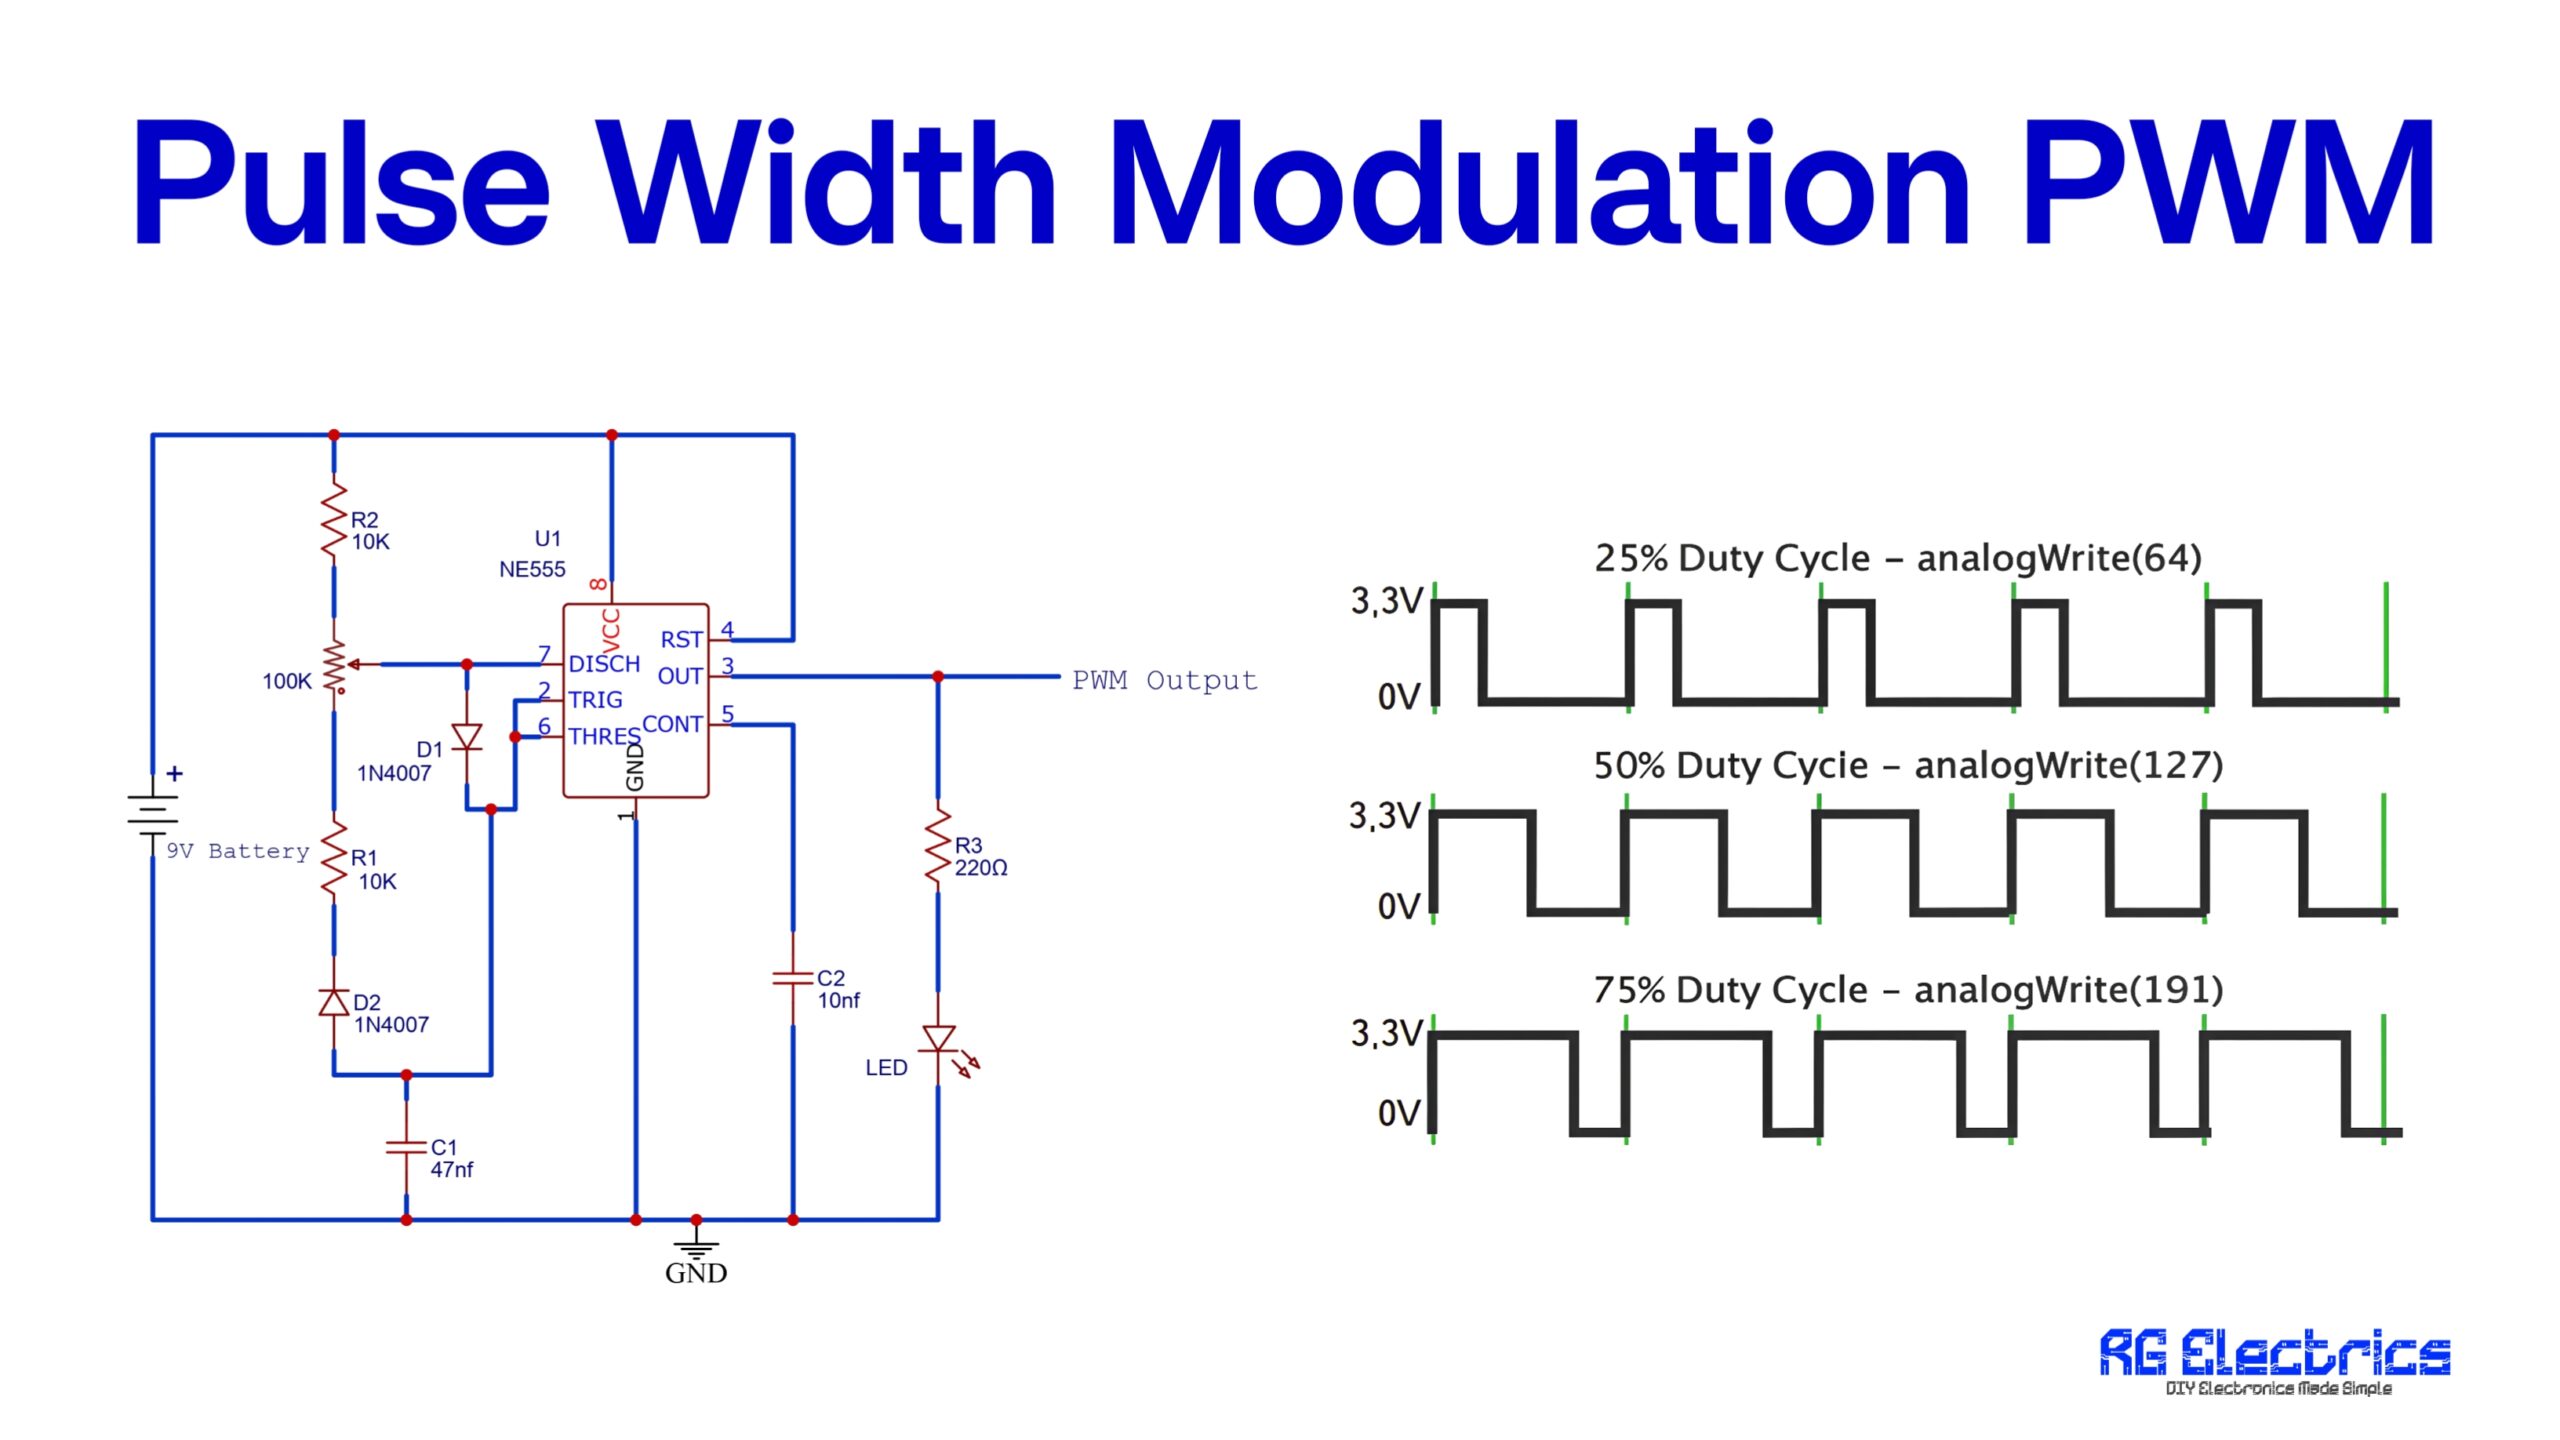
The circuit works by modulating the voltage or current supplied to the motor. A common method used is Pulse Width Modulation (PWM), where the average power delivered to the motor is adjusted by varying the duty cycle of pulses. This technique ensures efficient speed control with minimal power loss and heat generation.
The 12V DC motor speed controller circuit uses a 555 Timer IC in astable mode to generate a pulse-width modulation (PWM) signal. The duty cycle of this signal, controlled by a 100kΩ potentiometer, regulates the motor speed. A TIP122 Darlington transistor switches the motor based on the PWM signal, while diodes provide protection from reverse voltage and back EMF. The frequency of the PWM is controlled by resistors, capacitors, and diodes. This simple yet effective design allows smooth motor speed control with protection for the circuit components.
Components Details:
| S.no | Components | Value | Qty. |
|---|---|---|---|
| 1. | IC | NE555 | 1 |
| 2. | Transistor | TIP122 | 1 |
| 3. | Capacitor | 100nf | 2 |
| 4. | Resistor | 1KΩ | 2 |
| 5. | Variable Resistor | 100KΩ | 1 |
| 6. | Diode | 1N4007 | 3 |
| 7. | DC Motor | – | 1 |
| 8. | Power Supply | 12V | – |
TIP122 Pinout:

NE555 Pinout:

Circuit Diagram:

Circuit Details:
Let’s break down the circuit in detailed steps, explaining the functioning of each component and their relationships within the 12V DC motor speed controller circuit based on the 555 Timer IC:
1. Power Supply (12V DC):
- Input Voltage (12V DC): The circuit operates on a 12V DC power source, which powers both the 555 Timer and the DC motor.
- The 12V power supply is connected to the VCC (pin 8) of the 555 Timer and also supplies the motor via the TIP122 transistor.
2. 555 Timer IC (U1):
- Pin Configuration:
- Pin 1 (GND): This is the ground pin, connected to the negative terminal of the power supply.
- Pin 8 (VCC): This is the positive power supply pin, connected to the 12V supply.
- Pin 4 (Reset): This pin is connected to the power supply (+12V) to avoid accidental resets of the timer.
- Pin 5 (Control): Connected to a capacitor (C2, 100nF) to stabilize the internal reference voltage.
- Pin 6 (Threshold): Connected to Pin 7 and linked to the capacitor (C1, 100nF) to define the charging cycle for the PWM.
- Pin 7 (Discharge): This pin discharges the capacitor (C1) and controls the charging rate, which is tied to R1, D1, and D2.
- Pin 2 (Trigger): This pin triggers the output of the 555 Timer and is connected in such a way that it controls when the output pulse starts.
- Pin 3 (Output): The PWM signal is generated from this pin, which controls the switching of the motor via the TIP122 transistor.
The 555 Timer IC is configured in astable mode, meaning it generates a continuous square wave (PWM signal) at its output. The duty cycle of this square wave can be adjusted, and the frequency remains fixed. The duty cycle directly controls the speed of the motor by varying the power delivered to it.
3. Resistors and Capacitors (R1, R2, C1, C2):
- R1 (1kΩ): This resistor sets the charging and discharging time of the capacitor (C1). It controls the frequency of the PWM signal generated by the 555 Timer.
- C1 (100nF): This capacitor charges and discharges through the diodes (D1, D2) and R1, determining the ON and OFF time of the PWM signal.
- C2 (100nF): This capacitor is used for decoupling, stabilizing the voltage at Pin 5 of the 555 Timer. It ensures smooth operation of the timer by filtering out noise from the power supply.
4. Diodes (D1, D2, D3 – 1N4007):
- D1 & D2 (1N4007): These diodes form part of the timing network for the 555 Timer. They allow for separate control over the charge and discharge cycles of the timing capacitor (C1). This results in different on and off times, allowing control over the duty cycle of the PWM signal.
- When C1 is charging (ON time of PWM), it charges through D1.
- When C1 is discharging (OFF time of PWM), it discharges through D2.
- D3 (1N4007 – Flyback Diode): This diode is connected across the motor terminals to protect the transistor (Q1) from voltage spikes caused by the inductive nature of the motor. When the motor is suddenly turned off, it generates a high voltage in the opposite direction (back EMF), which can damage the transistor. D3 safely diverts this voltage away from the transistor, protecting the circuit.
5. Potentiometer (100kΩ):
- The potentiometer is used to adjust the duty cycle of the PWM signal. By turning the knob, the resistance value changes, which alters the time it takes for the capacitor (C1) to charge and discharge. This directly impacts the ON/OFF ratio of the PWM signal (duty cycle).
- A higher duty cycle means the motor receives power for a longer period in each cycle, increasing the speed.
- A lower duty cycle reduces the power time, thus decreasing the motor speed.
6. Transistor (Q1 – TIP122):
- The TIP122 is a NPN Darlington transistor, capable of handling high current, making it suitable for controlling the DC motor.
- The PWM signal from the 555 Timer’s pin 3 is sent to the base of the transistor via R2 (1kΩ), which limits the base current to protect the transistor.
- The emitter of the transistor is connected to ground, and the collector is connected to the motor’s negative terminal.
- The transistor acts as a switch:
- When the PWM signal is high (ON), the transistor conducts and allows current to flow through the motor, powering it.
- When the PWM signal is low (OFF), the transistor is turned off, cutting off the current and stopping the motor.
7. DC Motor:
- The DC motor is connected between the power supply’s positive terminal and the collector of the TIP122 transistor.
- The motor speed is controlled by the duty cycle of the PWM signal generated by the 555 Timer and switched by the TIP122 transistor.
- The flyback diode (D3) protects the motor from damage caused by the back EMF generated when the motor is abruptly turned off.
8. Working Principle (PWM Control):
- The 555 Timer generates a PWM signal based on the timing components (R1, C1, D1, D2).
- The potentiometer (100kΩ) adjusts the duty cycle of this PWM signal, varying the amount of time the transistor is turned on within each cycle.
- The transistor acts as a high-speed switch, rapidly switching the motor on and off. The motor’s speed is determined by the average power it receives, which depends on the duty cycle of the PWM signal.
- A high-duty cycle means the motor is on for longer in each PWM cycle, increasing its speed.
- A low-duty cycle means the motor is off for more of each PWM cycle, decreasing its speed.
Summary of Circuit Operation:
- Power Supply: The 12V DC power supply powers both the 555 timer circuit and the motor.
- 555 Timer IC: The timer generates a PWM signal, the duty cycle of which is controlled by the potentiometer. The frequency of the PWM is determined by R1, C1, and the diodes D1 and D2.
- Transistor (TIP122): The PWM signal controls the transistor, which switches the motor on and off according to the PWM duty cycle.
- Motor Control: The motor speed is adjusted by varying the duty cycle of the PWM signal using the potentiometer. The flyback diode (D3) protects the transistor from back EMF generated by the motor.
By adjusting the potentiometer, you can fine-tune the motor speed, making this circuit a simple but effective 12V DC motor speed controller.
Application:
- Industrial Automation
- Electric Vehicles
- Home Appliances
- Power Tools
- RC Vehicles